Table of Contents
- Part 1: The Basics
- Part 2: Creating An Ad
- Part 3: Optimizations
Creating an ad
The next section is a step by step tutorial for beginners on how to set up Facebook ads.
Choose a campaign type
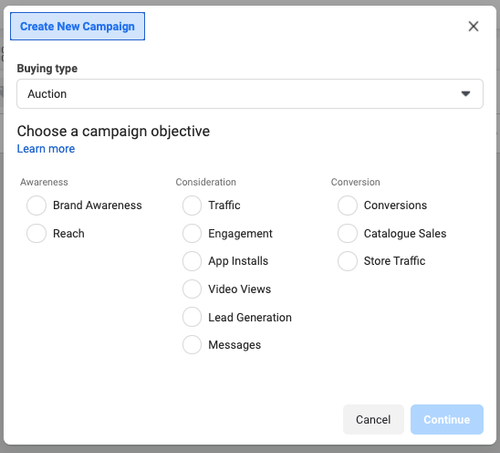
For the first step in setting up an ad, you will need to choose a campaign type (pictured below is the list of options you will see on the Business Manager website).
It’s important that you know your objectives before choosing a campaign type. I’ve listed in the next section some objectives and how they relate to different campaign types, plus a few major considerations you may need to take into account.
Objectives / Who are you marketing to
Once you know your objectives, it becomes easier to choose from the many options Facebook gives us (as seen in the above screenshot). For a business, your objectives might be to:
- Get people to like your posts (which I would use an engagement campaign for)
- Convince them to buy your product (conversion campaign)
- Increase the visibility of your brand (reach campaign)
The three objectives above can all be approached using different campaign types.
Traffic Campaigns
One example of a campaign type you may have already used, or heard of, is a traffic campaign. With this type, Facebook will try to get as many people to a landing page / website as it can, within budget. Eg. It’s a great way to drive people to an article you’ve written, or directly to your Spotify playlist. The reason I mention it is to give you an idea of how there is no right or wrong way to run ads, because you could use a traffic campaign to promote your Spotify playlists. However, I do not recommend this option if you’re using a landing page. Traffic campaigns are fine if you’re just running ads that directed to your Spotify link.
Conversion Campaigns [Recommended]
This is by far my favorite campaign type to use for advertising Spotify playlists. With this type of campaign Facebook will optimize your ad spend for conversions (website button click). This is the best option for your objective (if your objective is getting users to follow a Spotify playlist).
Facebook's ad structure: Campaign > Ad Set > Ad
Assuming you’re still with me, our next step is to create a “Campaign”.
Here’s a simple breakdown of how Facebook’s terminology works:
- Campaign
- Ad set #1 (where you choose your targeting)
- Ad #1 (a unique image or video)
- Ad #2
- Ad set #2 (where you choose alternative targeting)
- Ad #1
- Ad #2
As you can see, “Campaigns” contain “Ad sets,” which in turn contain “Ads”.
Create a campaign
First, when logged into business.facebook.com, find your way over to the Ads manager section. Make sure you’re logged into the correct personal and business manager accounts. I, for instance, control a few different business manager accounts (Indie Shuffle, SubmitHub, etc.) under my personal account (Dylan H).
- To set up a new campaign, from the top left hand corner of your screen, you must select Create (It’s a green button). A box with campaign details will appear.
- You’ll then need to decide on a buying type.
- We’ll use Auction, but if you want to find out more about the two types, you can do so here.
- The other option, Reach and Frequency, is better for reach campaigns that are focused on creating greater awareness for a product.
- Then choose a campaign type, and click Continue. This will take you to a new page view. For Indie Shuffle’s Spotify playlist campaign we chose a conversion campaign.
- There is an option to toggle on campaign budget optimization. Don’t worry about that now, but just remember that it’s here.
- Click “Next”.
Create an ad set
When you’ve completed your campaign setup you’ll be automatically directed to an ad set window. Here, if you haven’t already, you can set up a Pixel. You can also schedule your budget, customize your audiences, and decide on an ads manager feature called Dynamic creative.
The ad set level is about getting your audience targeting correct. (Note: If you already have lookalike or custom audiences, the Audience tab is where you will specify that you want to target them in your ads).
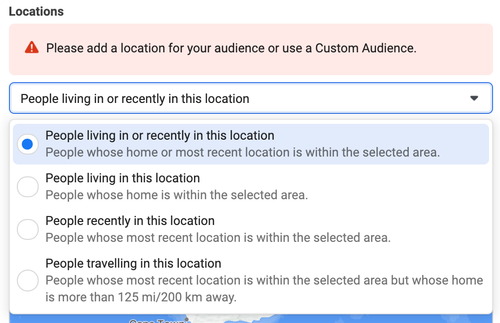
In the Audience tab of your ad set you have the ability to customize which geographical locations your ad should be shown in. Before doing that, be sure to decide if you want your ads shown to residents, current, or past visitors of that location, as per the first screenshot.
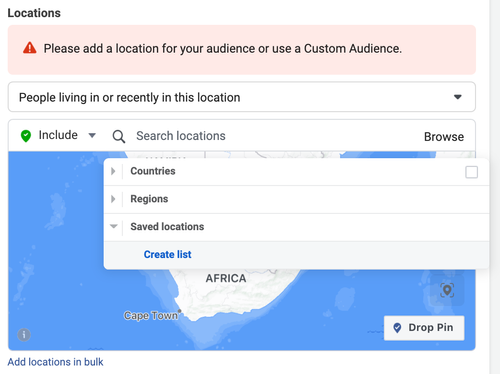
If you’re only looking to run ads in one or two countries, that’s great. Otherwise, to add lists of countries, at the bottom of the "Browse" drop down there is an option called "Create list".
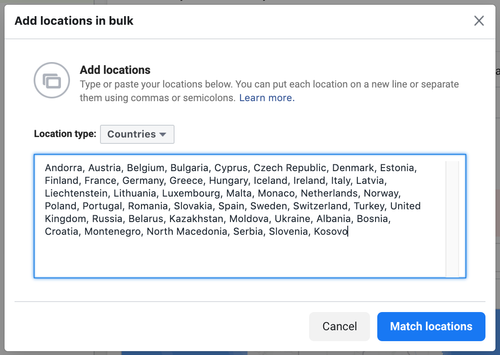
Considering that we will be promoting a Spotify playlist, it makes sense to only target countries that have access to Spotify, right? Here’s a list of those countries.
After choosing to create a list, paste the list of Spotify countries into the bulk location adder, which is the third screenshot, on the right. Et voila! Your ad set is set up to send your ads to Facebook users in all of those specified countries.
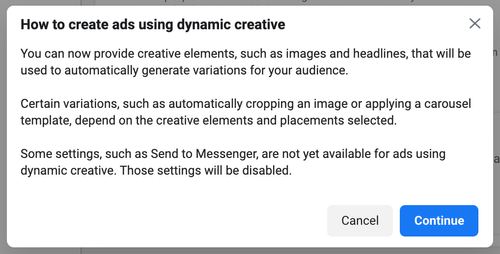
Lastly, there’s the Dynamic creative feature. It’s actually above the Locations tab in your ad set, but you’ll only really work with this feature in the next step, which is: Creating an ad. Here’s a screenshot of the pop-up that appears when you switch on Dynamic creative.
It’s a useful feature that is meant to make testing out many different ads a bit easier (which is an essential part of successfully running Facebook ads). With this functionality you will be asked to upload multiple ad images / videos and create headlines, descriptions, and primary texts. Facebook then tests different mixes of those inputs for you. This can save you a lot of time, but might not give you the level of control you need / seek, so play around to find what works best for you.
Setting up events at the Ad set level
Step one: Testing events
- Copy your landing page link from your SubmitHub Link dashboard.
- Navigate to Events manager.
- Underneath your Pixel select “Test events”.
- On the right you’ll see “Clear Activity”. Select that.
- If you don’t see “Clear Activity” that’s fine, skip step 4.
- Paste your SubmitHub Link into the Test browser events box.
- Select to “Open Website”.
- Click the Call to Action button (which, if you haven’t set one, by default is “Play”), then the Spotify logo, and finally the cover image.
- Now, check your Events manager, you should see, in the Events receive column, an entry called “View content”.
- If so, the events on your SubmitHub Link are firing properly, and you can proceed to run ads.
- If not, please check in at the SubmitHub #ads chatroom.
Step two: Setting up events
At the ad set level there’s a section called Conversion, that’s where we’ll be choosing the conversion event we tested for in step one.
- Make sure that you’ve added your SubmitHub Link url to the Website URL section at the ad level.
- Go back to the ad set level. In the section titled Conversion, select the Conversion event dropdown.
- You should see, under Active events, the option to choose “View content”. Choose that, and you’re done.
- If the option isn’t there, please visit the #ads chatroom.
Create an ad
There are loads of little considerations when it comes to setting up an ad. It’s pretty straightforward to start with, the ad needs to be connected to a Facebook and Instagram page. So first, set that up.
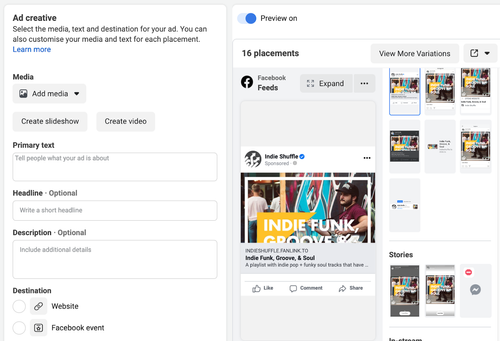
Next, it’s time to add the creative media (video or image), plus whichever of the text options you want to fill in (primary text, headline, description). Ultimately, how you approach this is your call, but I would encourage you to experiment with different mixes of inputs. Note: your screen will look different with Dynamic creative selected -- in which there will be the option to add many images / videos, headlines, descriptions, etc.
Next, insert the link to what you want to advertise (your landing page link), and make sure to decide on which Call to action button to use. There is the option to use no button, if that’s more suitable for the objectives of this campaign.
Lastly, there’s the option to enable extra tracking on your website. These are extra ways to track your site’s users, or people who have clicked on your ads.
Set your budget
Go back to the ad set level. Within a campaign that is where you will most often set your budgets. You can choose a Daily or Lifetime budget life cycle. Facebook will use up the amount you’ve budgeted every day, or just once, over a specified period of time.
Another consideration to make is the section titled Optimization and delivery. It provides yet another level of customization to your campaign, but is not necessary. So, for those interested, I will leave a quick guide to that here.
When you’re managing many ad sets in a campaign, it might be worth using a function of Facebook Business Manager called campaign Campaign Budget Optimization.
That feature is controlled at the campaign level. Toggle on the campaign budget optimization tab and set the amount you want to spend for all ads under that campaign. Facebook will then optimize how that amount is spent for ads underneath your campaign. The system will use your budget and bid strategy to determine the lowest-cost opportunities across your audiences. Again, you can specify the optimized budget to be a daily amount or the lifetime (total) spent on that ad.
Activate your ad
Nice! You’ve filled out your ad, and it’s ready to go. Hit publish and make sure to keep an eye on how it’s performing. It’s a good idea to leave ads for at least three days before toggling them off or making any big changes.
Occasionally when you go to publish an ad there is information missing that Facebook needs you to fill in. At the step, keep an eye out for banners at the top of your screen, or, as you’re going along, for red text at the ad set and ad levels.
So, that’s the basics of setting up ads with Facebook Business Manager. I’ve listed a few extra considerations and ideas in part three, which you can access here.
Next step: Optimizations (Part 3)
https://www.submithub.com/story/promote-spotify-facebook-ads-optimizations
 Dylan Heneck